The UIWebView class allows you
to embed web content inside your application. This class is
the simplest but least flexible way of getting network content into your
application. A UIWebView is best used
to display content. If you want to manipulate the content
programmatically, you should skip ahead a couple of sections and look at
the discussion of the NSURLConnection
class. However, there are a few tricks you can play to retrieve the
displayed content from the UIWebView
once it has been downloaded, and I’ll talk about them later in the
section.1. A Simple Web View Controller
There are a number of cases where you might want to load a URL and
display a web page, but keep users inside your application rather than
closing it and opening Safari. If this is what you need to do, you
should be using a UIWebView.
So, let’s build some code that you’ll be able to reuse in your own
applications later. The specification for this code is a view controller
that we can display modally, which will display a UIWebView with a specified web page, and can
then be dismissed, returning us to our application.
I’m going to prototype the code here, hanging it off a simple view
with a button that will pull up the modal view. However, the view
controller class is reusable without modification; just drag and drop
the code out of this project and into another. This is also a good
exercise in writing reusable code.
Open Xcode and start a new project, choose a view-based iPhone OS
application, and when prompted, name it “Prototype”. The first thing we
want to do is set up our main view; this is going to consist of a single
button that we’ll click to bring up the web view. Click on the
PrototypeViewController.h interface file to open it
in the editor, and add a UIButton
flagged as an IBOutlet and an
associated method (flagged as an IBAction) to the interface file. The added
code is shown in bold:
#import <UIKit/UIKit.h>

@interface PrototypeViewController : UIViewController {
    IBOutlet UIButton *goButton;
}

-(IBAction) pushedGo:(id) sender;

@end
Now, open the PrototypeViewController.m
implementation file and add a stub for the pushedGo: method. As always, you have to
remember to release the goButton in
the dealloc: method:
-(IBAction) pushedGo:(id) sender {
// Code goes here later
}
- (void)dealloc {
    [goButton release];
    [super dealloc];
}
Next, we need to add a new view controller class to the project.
This is the class we’re going to use to manage our UIWebView. Right-click on the Classes group in
the Groups & Files pane in Xcode and select Add→New File, select the UIViewController subclass template from the
Cocoa Touch Class category, and check the “With XIB for user interface”
box. When prompted, name the new class “WebViewController”.
Three files will be created: the interface file
WebViewController.h, the
implementation file WebViewController.m, and the
view NIB file WebViewController.xib.
After creating this new view controller, we need to leave Xcode
for a moment. Double-click on the
PrototypeViewController.xib file to open the NIB
file in Interface Builder. Drag and drop a round rect button (UIButton) into the view and change its text to
something appropriate; I picked “Go!”. (You can find the button in the
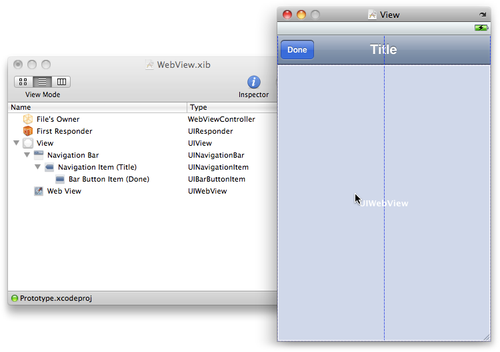
Inputs & Values category of the Library.)Next, click on File’s Owner in the
WebView.xib window. In the Connections Inspector
(⌘-2), connect both the goButton
outlet and the pushedGo: received
action to the button that you just dropped into the view, choosing Touch
Up Inside as the action; see Figure 1. Make sure you
save your changes to the
PrototypeViewController.xib file and close it.
We’re done with the PrototypeViewController class for now.

Now we need to build our web view. Double-click on
WebView.xib to open the NIB file in Interface
Builder. Drag and drop a navigation bar (UINavigationBar) from Library→Windows, Views & Bars, and position it at
the top of the view. Then drag a web view (UIWebView) from Library→Data Views into the view and resize it to fill
the remaining portion of the View window. Check the box marked Scales
Page to Fit in the Attributes Inspector (⌘-1). Finally, drag a bar
button item (UIBarButton) onto the
navigation bar, and in the Attributes tab of the Inspector window change
its identifier to Done. Once you’re done, your view will look similar to
Figure 2.
After saving the changes to the WebView.xib
file, close it and return to Xcode. We now need to implement the
WebViewController class before we can
connect the new UI to our code.
Open the WebViewController.h interface file.
We want to make this class self-contained so that we can reuse it
without any modifications. Therefore, we’re going to override the
init: function to pass in the URL
when instantiating the object. Make the following changes to the file
(notice that I’ve added <UIWebViewDelegate> to the interface
declaration):
#import <UIKit/UIKit.h>

@interface WebViewController : UIViewController <UIWebViewDelegate> {
NSURL *theURL;
NSString *theTitle;
IBOutlet UIWebView *webView;
IBOutlet UINavigationItem *webTitle;
}

- (id)initWithURL:(NSURL *)url;
- (id)initWithURL:(NSURL *)url andTitle:(NSString *)string;
- (IBAction) done:(id)sender;
@end
In fact, to give a bit more flexibility to the class, I provided
two different init: functions:
initWithURL: and initWithURL:andTitle:. There’s also a done: method flagged as an IBAction that we can connect to our Done
UIBarButtonItem when we go back into
Interface Builder.
We’ve declared an NSURL and an
NSString to store the URL and view
title passed to our init methods,
along with a UIWebView and a UINavigationItem flagged as IBOutlet to connect to the UI elements we
created previously in Interface Builder.
If you add the UINavigationBar
to your modal view inside Interface Builder, as we have
done here, it is not managed by a UINavigationController. This means you
cannot set the title of the navigation bar inside your view controller
using the self.title or the
self.NavigationItem.title
property. There are several ways around this problem, but one of the
easier ways is to declare a UINavigationItem
IBOutlet in the view controller’s interface file, and then
in Interface Builder connect this outlet to the UINavigationItem that contains the title
(you’ll need to switch the WebView.xib window into list mode with
Option-⌘-2 and expand the navigation bar). Once this is done, you can set the title in the navigation bar
from the viewDidLoad: or viewDidAppear: method using the title property of the instanceUINavigationItem IBOutlet variable that you
declared. variable pointing to your |
Now, open the WebViewController.m
implementation file. We’ll start by implementing the two initWith methods. Add the following code to
the file:
- (id)initWithURL:(NSURL *)url andTitle:(NSString *)string {
    if( self = [super init] ) {
        theURL = url;
        theTitle = string;
    }
    return self;
}

-(id)initWithURL:(NSURL *)url {
    return [self initWithURL:url andTitle:nil];
}
Next, we have to load the URL into the view, and we’ll do that in
the viewDidLoad: method. Uncomment
the viewDidLoad: method and add the
lines shown in bold:
- (void)viewDidLoad {
    [super viewDidLoad];
    webTitle.title = theTitle;
NSURLRequest *requestObject = [NSURLRequest requestWithURL:theURL];
[webView loadRequest:requestObject];
}
Now we have to deal with what happens when the user dismisses the
view by tapping the Done button. Add the following to the file:
- (IBAction) done:(id)sender {
    [self dismissModalViewControllerAnimated:YES];
}

- (void)viewWillDisappear:(BOOL)animated {
    [super viewWillDisappear:animated];
    webView.delegate = nil;
    [webView stopLoading];
}
Finally, we have to make sure we release our declared variables in
the dealloc: method. Add the lines
shown in bold to this method:
- (void)dealloc {
    [webView release];
[webTitle release];
    [super dealloc];
}
We’re not quite done yet. Back in the
PrototypeViewController.m file we still need to
implement the pushedGo:
method. Replace // Code goes here
later with the code shown in bold:
-(IBAction) pushedGo:(id)sender {
    NSURL *url = [NSURL URLWithString:@"http://www.apple.com/"];
WebViewController *webViewController =
[[WebViewController alloc] initWithURL:url andTitle:@"Apple"];
[self presentModalViewController:webViewController animated:YES];
[webViewController release];
}
Remember that since we’ve used the class in the pushedGo: method, we also now need to import
the WebViewController.h header file into the
PrototypeViewController. So, go to
the top of PrototypeViewController.m and add this
line:
#import "WebViewController.h"
We’re done in Xcode. Now we have to go back into Interface Builder
and connect the web view to our controller code. Open the
WebView.xib file in Interface Builder. Make sure
you are in List view mode (Option-⌘-2) and expand the view completely,
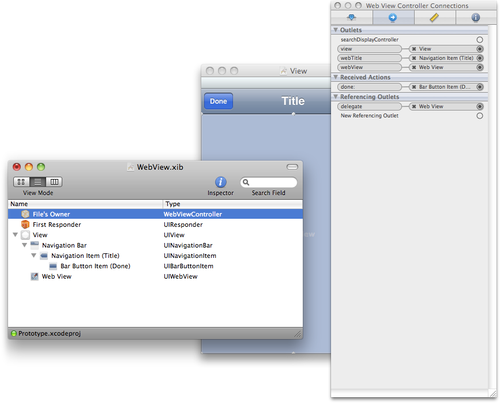
then click on File’s Owner. In the Connection Inspector:
Connect the webTitle outlet
to the UINavigationItem
“Navigation Item (Title)”.
Connect the webView outlet
to the UIWebView “Web
View”.
Connect the done: received
action to the UIBarButtonItem
“Bar Button Item (Done)”.
Finally, click on the web view and connect the delegate outlet back to File’s Owner.
At this point, if you click on File’s Owner in the main NIB window
and check the Connections tab, you should see something similar to Figure 3.
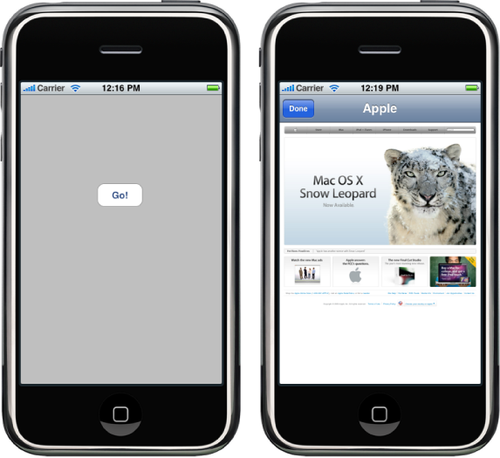
Save the NIB and return to Xcode. Click on the Build and Run
button in the Xcode toolbar to compile and start the application in
iPhone Simulator, as shown in Figure 4. Tap the Go!
button and the Apple website should load in your view. Remember that
you’re making a network connection here, so you might have to be a bit
patient depending on the speed of your network connection.
Of course, users don’t like to be patient, and we currently don’t
have a way to indicate to them that our application is doing something
they need to be patient about. This is where the UIWebViewDelegate
protocol comes in; we declared WebViewController as a web view delegate, but
so far we haven’t taken advantage of that.
The delegate protocol offers two methods: webViewDidStartLoad:
and webViewDidFinishLoad:. We can
use these to start and stop the network activity indicator in the
iPhone’s toolbar to indicate that we’re transferring data and the user
should be patient. Add these two methods to
WebViewController.m:
- (void)webViewDidStartLoad:(UIWebView *)wv {
    [UIApplication sharedApplication].networkActivityIndicatorVisible = YES;
}

- (void)webViewDidFinishLoad:(UIWebView *)wv {
    [UIApplication sharedApplication].networkActivityIndicatorVisible = NO;
}
But what happens if our URL fails to load? Even if we checked
reachability before creating the view controller, what if we lose the
network connection while the page itself is loading? The delegate
protocol also provides the webView:didFailLoadWithError:
method to inform us that something has gone wrong. Add the
following to WebViewController.m:
- (void)webView:(UIWebView *)wv didFailLoadWithError:(NSError *)error {
    [UIApplication sharedApplication].networkActivityIndicatorVisible = NO;

    NSString *errorString = [error localizedDescription];
    NSString *errorTitle =
               [NSString stringWithFormat:@"Error (%d)", error.code];

    UIAlertView *errorView = [[UIAlertView alloc]
      initWithTitle:errorTitle
      message:errorString
      delegate:self
      cancelButtonTitle:nil
      otherButtonTitles:@"OK", nil];
    [errorView show];
    [errorView autorelease];
}
Since we said our view controller class is the UIAlertView delegate, we also have to declare
the class as a UIAlertViewDelegate in
the WebViewController.h interface file:
@interface WebViewController :
UIViewController <UIWebViewDelegate, UIAlertViewDelegate> {
... no changes to the code inside the declaration ...
}
With this change made, we can make use of the UIAlertViewDelegate
protocol back in our implementation to dismiss the web view pane when an
error is received loading our URL. Add the following to
WebViewController.m:
- (void)didPresentAlertView:(UIAlertView *)alertView {
    [self dismissModalViewControllerAnimated:YES];
}
We’re done. With these changes, the application can tell the user
that it is doing something, and can handle any errors that occur when
loading the URL. Click on the Build and Run button in the Xcode toolbar
to compile and start the application in iPhone Simulator. Tap the Go!
button and you should see the activity indicator spinning in the toolbar
next to the WiFi signal strength icon as the application loads Apple’s
web page. When it finishes, the spinner should stop.
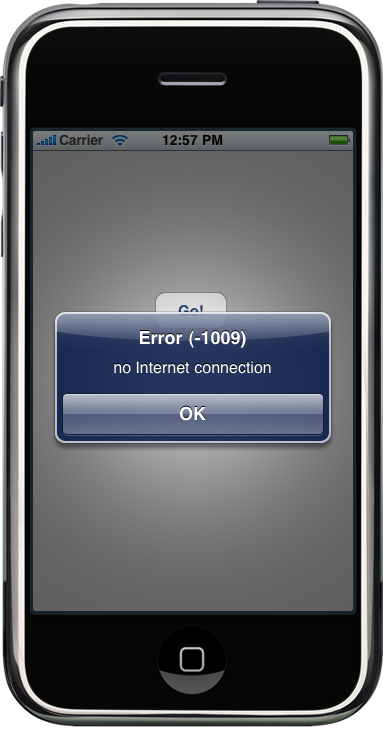
Click Done, and then either turn Airport off or unplug your
Ethernet cable. Now try again, and you should get something that looks
like Figure 5,
informing you that you no longer have an Internet connection.
2. Displaying Static HTML Files
We can use the UIWebView
class to display HTML files bundled into our project. In fact,
we can add HTML documents to our project in the same way we dragged and
dropped the images into the City Guide application; .
Suppose we’re going to use a web view to display a help document
for our application. We could do so as follows:
NSString *filePath =
  [[NSBundle mainBundle]
    pathForResource:@"HelpDocument" ofType:@"html"];

NSData *htmlData = [NSData dataWithContentsOfFile:filePath];

if (htmlData) {
    [webView loadData:htmlData
             MIMEType:@"text/html"
             textEncodingName:@"UTF-8"
             baseURL:[NSURL URLWithString:@"http://www.babilim.co.uk"]];
}
We grab the file path to our bundled resource, create an NSData object, and pass this to our web
view.
Since we can specify the base URL of our web view, we can use a trick to embed
small images directly into our application bundle by setting this base
URL for our HTML document correctly. For instance, if we have an HTML
document in the NSString variable
htmlDocument, we could add this
snippet: NSString *filePath = [[NSBundle mainBundle] bundlePath];
NSURL *baseURL = [NSURL fileURLWithPath:filePath];
[webView loadHTMLString:htmlDocument baseURL:baseURL];
This will load the HTML document into our UIWebView. However, it will also set the
base URL to the root of the application bundle and allow us to add
images (or other content) into our application and refer to them
directly in our document (or an associated CSS file): <img src="image.png">
You should note that even if you store your images inside a
folder in your Xcode project, they will be at the root of the
application bundle file when you build and deploy your
application. |
3. Getting Data Out of a UIWebView
A UIWebView is primarily
intended to display a URL, but if need be you can retrieve the content
that has been loaded into the view using the stringByEvaluatingJavaScriptFromString: method:
NSString *content =
 [webView stringByEvaluatingJavaScriptFromString:@"document.body.outerHTML"];